One of big announcement of Salesforce TDX 2025 is the possibility to provision a developer edition with all Agentforce related features available in it. We will show how to provision it.
And great precision – compared to former Agentforce / Data Cloud playgrounds with which you may have played for your Trailhead modules so far – this Agentforce-fueled Dev Edition is available as long as your regularly use it (one login every 45 days !).
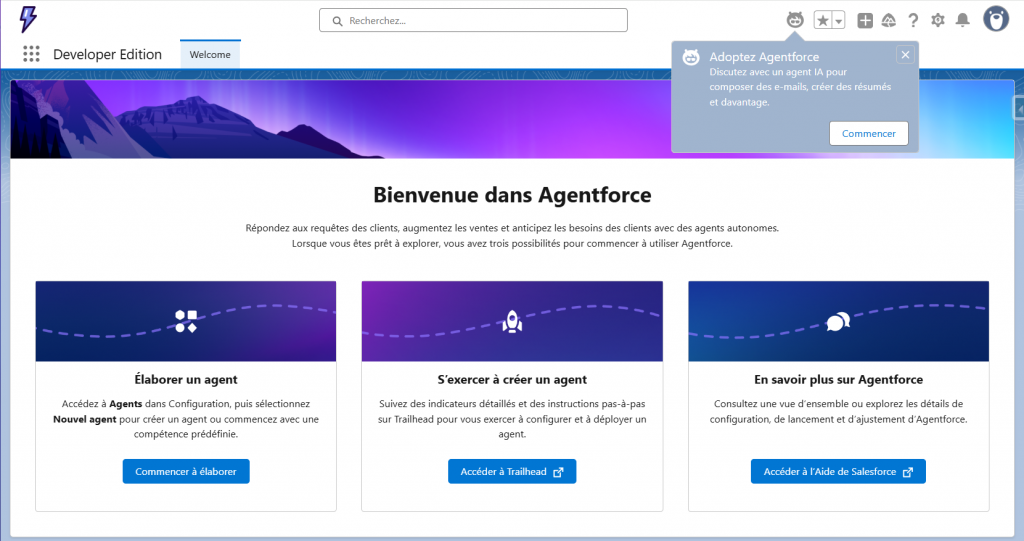
The QR Code to flash to get your own AI-fueled personal Dev EditionAgentforce Dev Edition home page
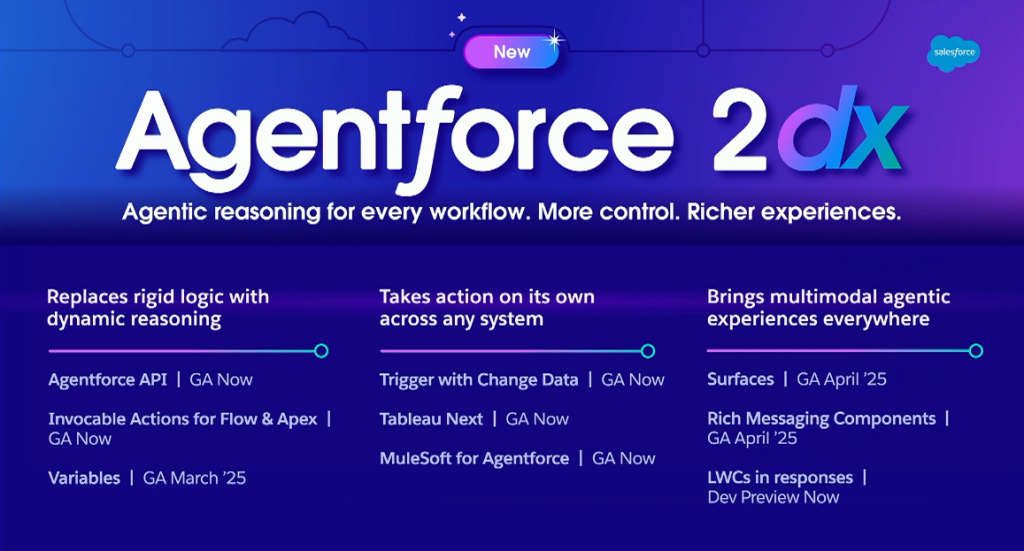
For information, other news about Headless / Agentforce API have been shared during this session ; Agentforce is not only used by an human
New features related to Agentforce, centered on enhancing the interaction with the platform
This communication echoes some previous materials shared by Salesforce teams, like the two following ones, available in Youtube, on Salesforce Developers‘ account, published a couple of weeks, before TDX’25 event :
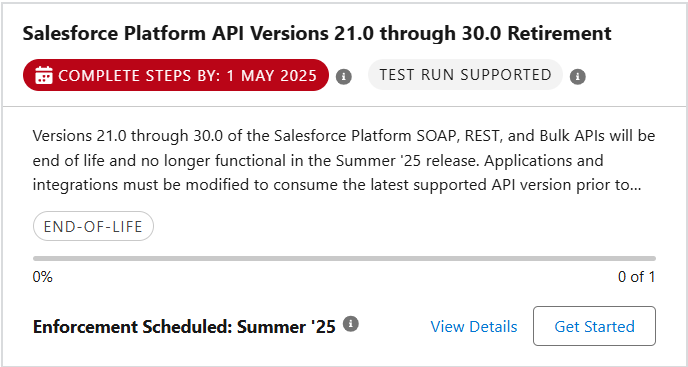
Indeed, this topic was postponed, and is back again in your release update listing for upcoming Salesforce Winter’25 release. So how do we prepare for this API retirement ?
Accordingly, when this release update is live, external applications, which consumes these old Salesforce REST / SOAP / BULK API versions, will stop working, as these calls will fail (endpoint is not found).
Identify if your Salesforce instance is called through an old API version
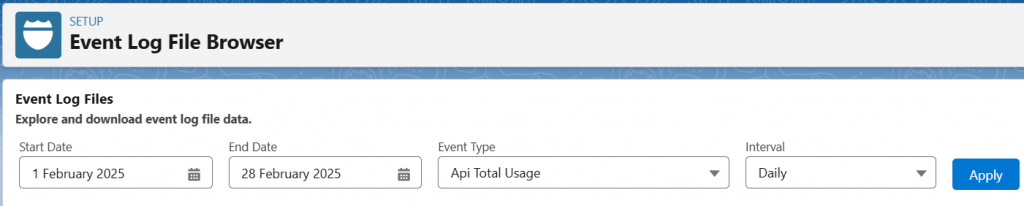
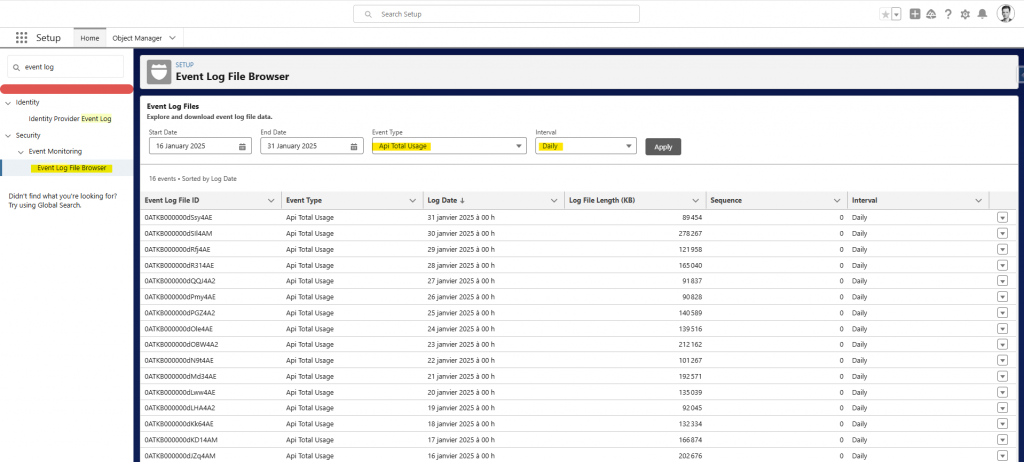
Please navigate to Setup > Event Log File Browser to investigate. Then, once you have landed on the tool page, launch an analysis of your API Total Usage, on a daily basis, on a 1-month duration, here for example, from February 1st to February 28th.
This way, it provides a sufficiently broad window to ensure that all usages will be caught in this analysis, and that all calls to versions lower than v30.0 will be detected.
Event log file browser usage – Target API Total Usage on a daily basis
Once the time frame is selected, and you have chosen « API Total Usage » and a « Daily » interval, click Apply.
Event log file browser usage – Study every file on a day to day / file to file approach
For each day, download the file (click the arrow at the end of each line).
Event log file browser usage – download all files of the observed period & open them all in VS Code
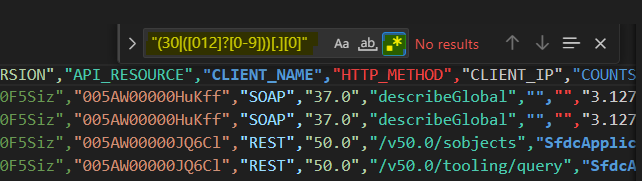
Then, open each file, and look for API version below v30.0. In my case, I have handled this search with VS Code application. To find all the v21.0 to v30.0 usages occurrences, I have used the following regular expression : « (30|([012]?[0-9]))[.][0] »
Use VS Code’s Find feature with « Use Regular Expression » option (Ctrl+F then Alt+R) – Make sure to use proper double quotes in the regular expression !Visualization of a file downloaded for all API Usages of a specific day (VS Code used for this part)
Make project teams adapt their calls to Salesforce
Besides, once you have found some occurrences using soon-to-be deprecated API versions, you have all that you need to identify where they come from :
« API_RESOURCE » : the URL resource that is involved in this API usage (« query », « update », « DescribeSObjects », « v29.0/query », « /v29.0/sobjects », « /v27.0/chatter/users/me »...)
« USER_ID » : the user who has called this resource
After you have grouped all these usages (by application type or by user), contact the different project teams to ask them to update their connector or code.
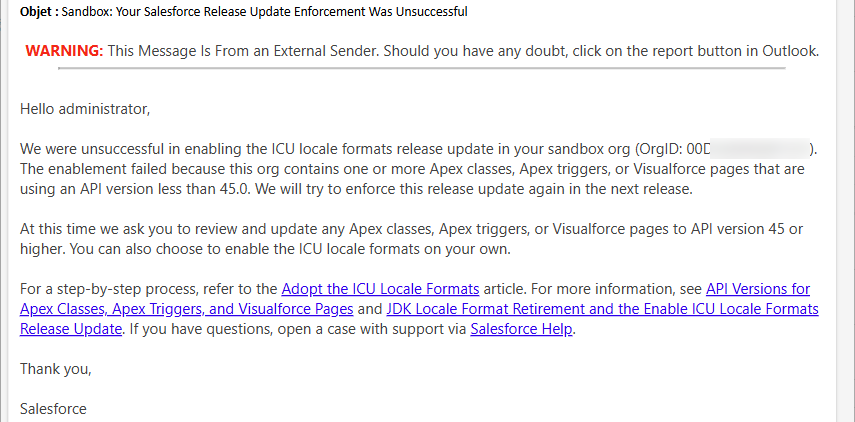
Maybe, have you received this communication from Salesforce after Spring’25 release update, either for your Production instance, or your non-preview sandboxes :
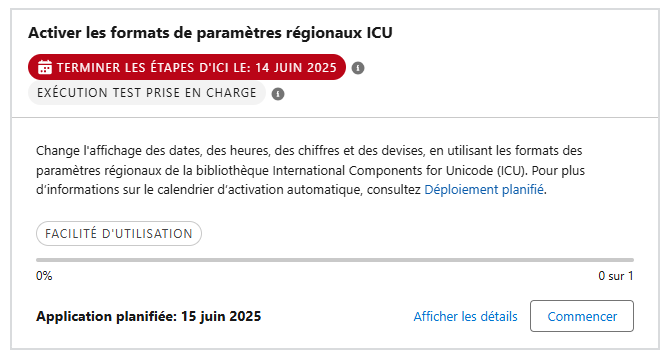
ICU activation failed – Do not worry..! Prepare for Summer’25 next slot
For Salesforce Spring’25 release update, ICU locale format was planned to be activated. I will explain how to prepare your Salesforce org for upcoming ICU format release update for Summer’25 if you have missed Spring’25 activation ?
But indeed, as mentioned in the documentations from Salesforce, you will find under this article, this upgrade from JDK previous format, towards ICU international format, was only possible if all technical (Apex, Visualforce, and Lightning) components of the platform were compliant (above API 45.0 version). If your Salesforce instance contains lower API versions of these components, Salesforce won’t enable ICU locale formats in your org, and indeed you should have received this email.
If ever you are concerned by the unsuccessful upgrade, and you received this email, please do not worry, and read the following article. There will be another ICU format activation slot, linked to next Summer’25 release upgrade (June 2025).
Introduction : What’s behind ICU Format ?
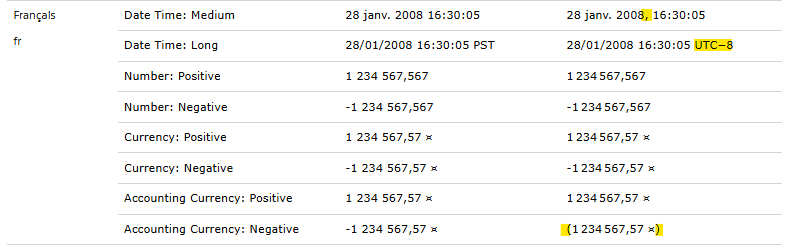
As an introduction, just to know what is behind the ICU letters, in this help article, Salesforce details the impacted locales / users, and the differences between both JDK and ICU formats for these locales :
A very straight-forward Action Plan, within just a few steps !
Assessment of your useR locales : Who will be impacted by ICU Update
From a pragmatic point of view, you need to tackle all technical actions, listed by Salesforce, to make sure the upgrade could pass next time. I suggest that you follow the procedure & query detailed by Salesforce in their exhaustive documentation (see below). You will find below a short version of it based on the actions I have followed on the instances I handle.
First, query your org to see your impacted users, and their locale. For information, Canada (en_CA locale) requires a specific activation to handle separately.
SELECT toLabel(LocaleSidKey) LocaleName, LocaleSidKey, Count(id) UserCount
FROM User where IsActive=true GROUP BY LocaleSidKey
ORDER BY Count(id) desc
You would be then able to visualize the way your date / values informations will be displayed (important, especially if you have some text manipulation of those data types).
Enable the ICU feature on a sandbox first
Go to Setup > Release updates, look for the ICU release update, click Get Started, and enable it. Do it first in a sandbox, and test that it does not generate regression errors in this sandbox ! Then apply on other sandboxes, testing instances and after that in Production.
Identify technical components to update to stick with ICU Release Update
As written above, if your instance contains technical components (Apex classes, apex triggers, Visualforce pages or components, Lightning components, managed packages), Salesforce asks you to upgrade their API version.
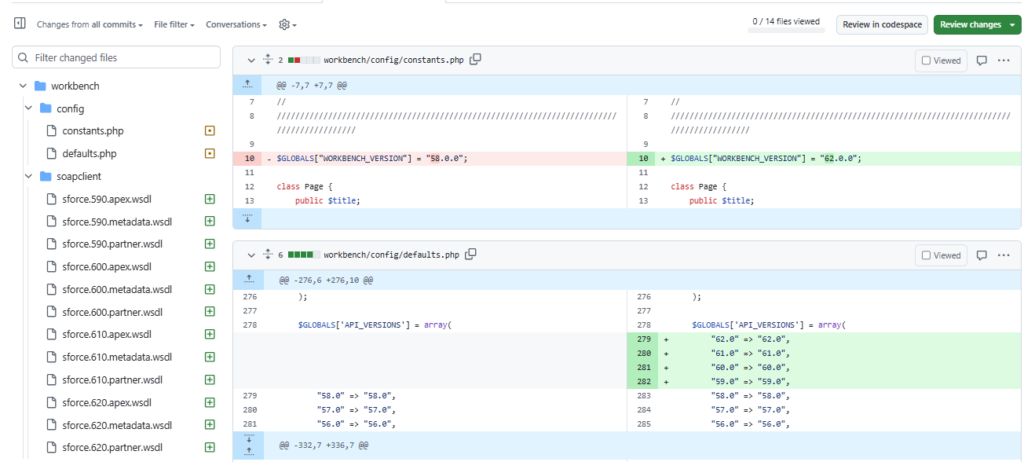
Always use as a target the Production version (target v62.0 for example, even when Preview sandboxes are in v.63.0 version) to prevent you from being blocked when deploying your updated components in Production.
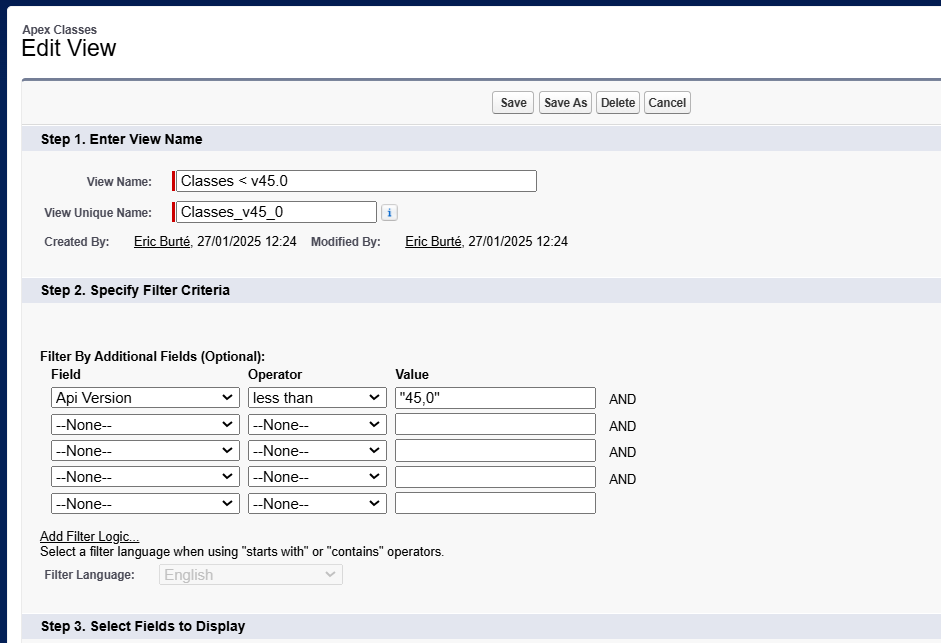
To identify them, you may either leverage SOQL query on concerned Salesforce technical objects, or use a dedicated list view on each of these component types in Setup pages.
a « Classes < v45.0 » view, for Apex classes (see the example below)
a « Triggers < v45.0 » view, for Apex triggers
a « VFP < v45.0 » view, for Visualforce pages
a « VFC < v45.0 » view, for Visualforce components
a « LWC < v45.0 » view, for Lightning components (Aura and LWC)
You may also query your instance (on ApexClass, ApexTrigger, ApexPage and ApexComponents objects) with Salesforce Inspector Reloaded, if more convenient for you.
SELECT Id, Name, ApiVersion, IsValid, NamespacePrefix
FROM ApexClass
WHERE ApiVersion < 45
ORDER BY ApiVersion DESC
Upgrade your code to a version compliant with ICU format
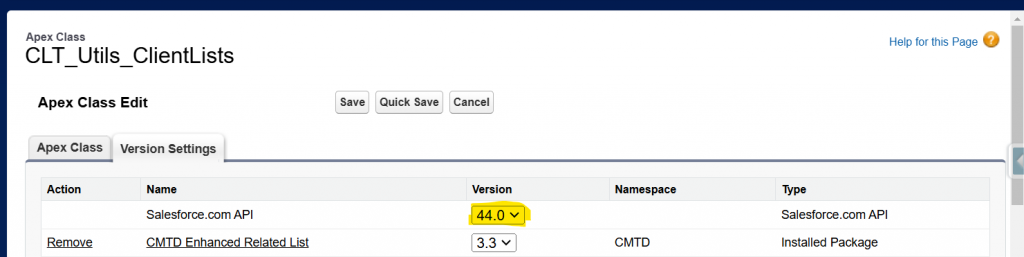
As written above, navigate through Setup, select the concerned components (for example « Apex Classes » for Apex classes) setup page, click on the metadata to update, Edit, access the « Salesforce.com API » version line, and update to target version.
Class version in v44.0..just changed in a click to v62.0 (you can also open them in Dev Console if more convenient to do it)
If the component is compliant, the class will be updated within the correct version. Otherwise, you will be warned when saving, that there is an error in it, as you are when you are coding / saving in Dev Console / VS Code.
In this case, some changes would need to be undertaken while updating the code version of your components. For example, in API 59.0 version, the getSalesforceBaseUrl() method has been deprecated. So if your code includes a call to this method, you have 2 options :
update this class to the latest / more recent compliant API version, where the method was available (v58.0 in this case) ; that could go faster for this time, but that is something that will need to be addressed sooner or later..
take advantage of this overall « platform-related action plan », to include some refactoring technical actions / tickets to update the code (here, in this example, replace the method by a call to getOrgDomainUrl() available since v59.0)
Update your packages
Update the unmanaged code to the latest Apex version, as you have done previously
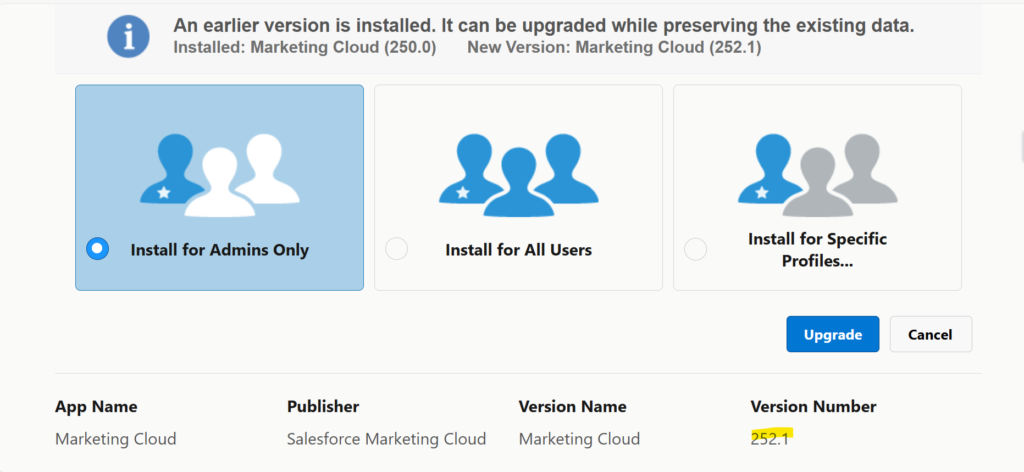
Update your managed packages (through AppExchange updates)
If you use Salesforce related packages (Marketing Engagement / Pardot, Marketing Cloud Connector), Salesforce should enable this kind of features with their automatic release updates. As an admin, you still can update the package if nothing is available.
If you use 3rd-party-vendor’s managed packages (for CTI, for Org assessment, or for any feature improvement scenarios), you would necessarily need to look for package updates on AppExchange, or on the asset homepage / repository. Do not hesitate to contact the editor company if there is no update available.
Deployment in UAT for Non Regression testing, before Production
Deploy these technical elements before activation, in UAT for non-regression tests
Code to be deployed / updated first
Managed packages to be updated after, accordingly to the action plan you have set up for your test sandbox.
Once done and tested, deploy into Production, as soon as the tests on UAT are successful, and you will be ready for next ICU activation slot !
PS : If you have many teams working / deploying on Salesforce, do not forget to let them know about this action plan. They will need to be consistent concerning both coding / deployment / testing actions
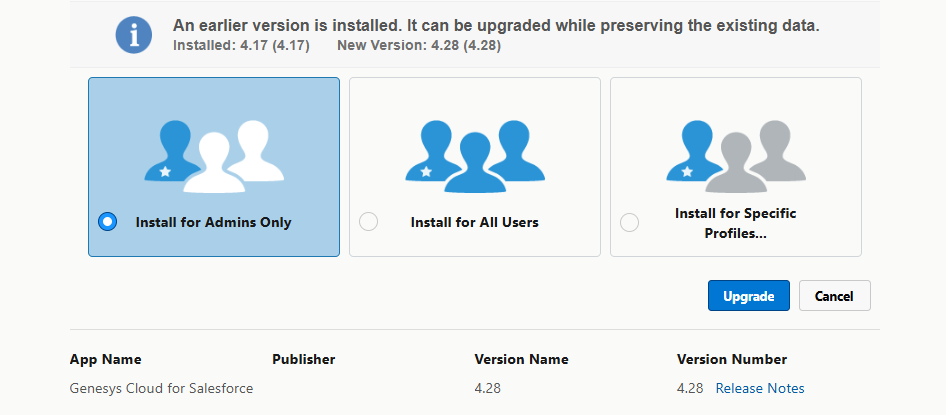
When you update a package, except if the former Salesforce consultant / administrator wrote a documentation, there is no specific indication telling you how a package was installed (either in setup’s « Installed Packages » page, or in the package installation/update screen).
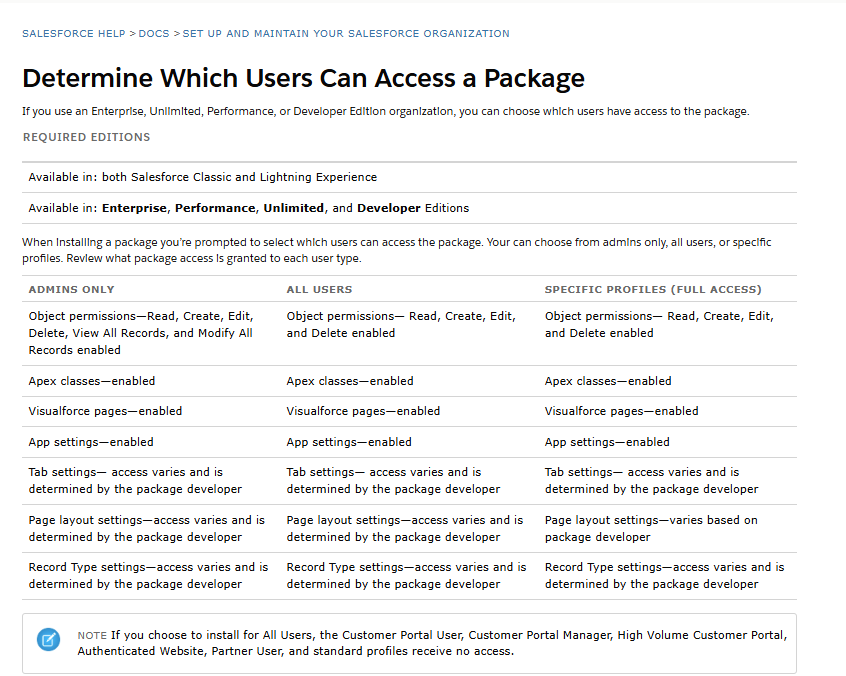
So how to choose how you should grant access to this application / package ?
First, have a look to this article to see the differences between the suggested options :
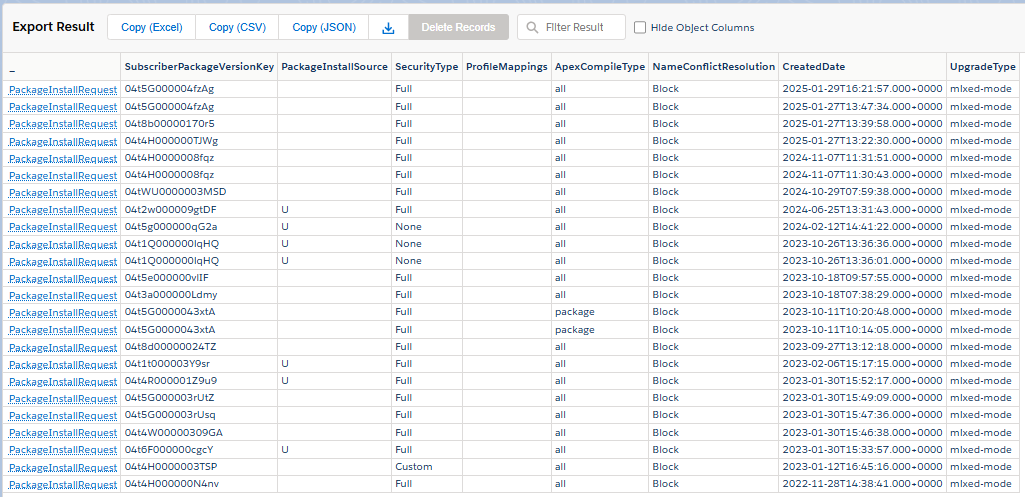
Concerning your instance, open your Salesforce Inspector Reloaded extension (or your preferred solution to query your Salesforce instance). You can directly leverage the query below, on your target instance, to get details on Package Installation Requests records that were made on it (do not forget to check the tooling API checkbox) :
SELECT SubscriberPackageVersionKey, PackageInstallSource, SecurityType, ProfileMappings, ApexCompileType, NameConflictResolution, CreatedDate, UpgradeType
FROM PackageInstallRequest
ORDER BY CreatedDate DESC
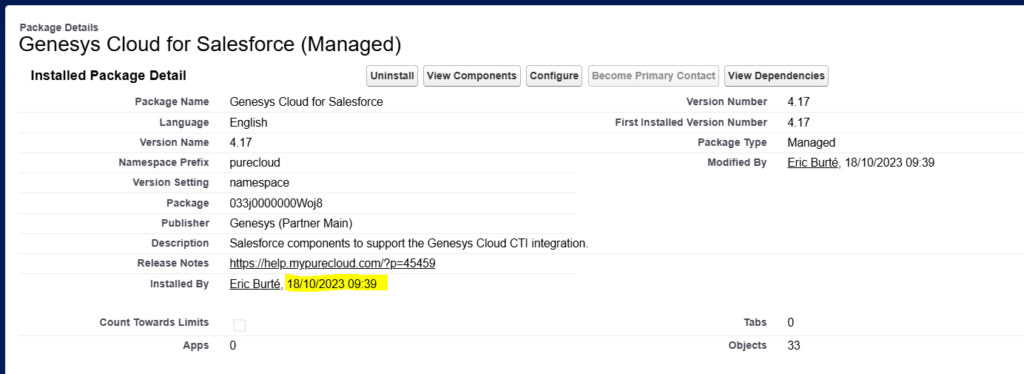
Now, if we want to link this data with the installed package, please navigate through Setup > Apps > Packaging > Installed Packages. Then click on the concerned package.
On the installed package details page, we can see when this package had been installed.
It seems quite logical that the package installation is linked to this Package Installation Request record, in our case highlighted in yellow (take into consideration your timezone versus the display in GMT time).
Now, take a look at the SecurityType field ; this field can take the following values :
None : Installed only for System Administrators.
Full : Installed for all Users.
Custom : Installed for Custom profiles (specified during the package installation).
This way, when updating your packages, you will be able to step into the footprints of the first installation. Enjoy your updates !
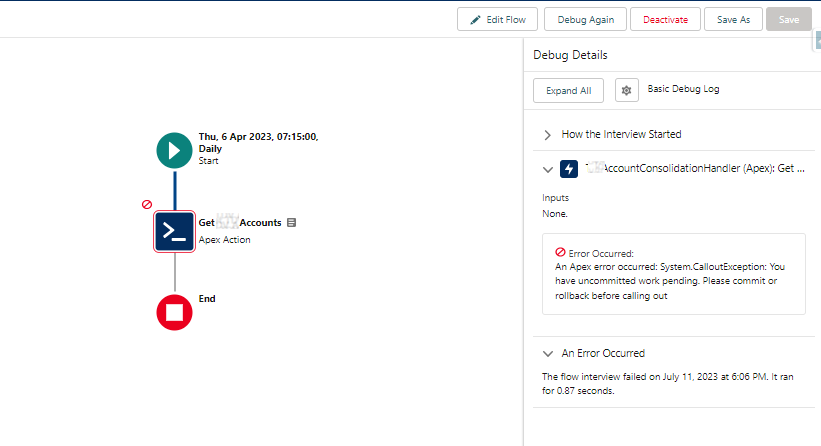
I built, some time ago, a very simple scheduled flow that only called an invocable method, calling itself an external virtualization system, to retrieve accounts from it, and to copy them back in Salesforce.
When I ran it, in debug mode (Debug > Run), the flow was failing with a strange « Callout exception » due to pending in-progress work ! (cf picture below)
CallOut – Exception message
But when I call (in anonymous action) directly the method called by the action, it works fine !
What happens is that there were some DML operations in progress, when the scheduled flow was fired, meaning that some accounts records were not in a stable saved state.
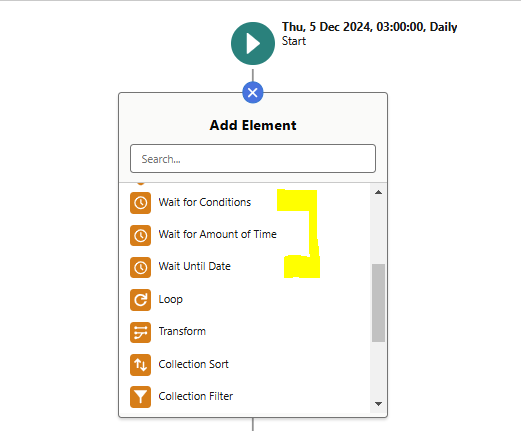
In this case, you can naturally try to reorganize your code and flows to make sure there will be no element interfering with your DML. But, in case of a refactoring complexity, or short timing, if you ever face this case, to commit the in-progress transactions, you could use :
a Screen element (on a screen flow)
or a Pause element (on a scheduled flow) : reaching a Pause element ends the current transaction. When the flow resumes after the pause, the Get Records does not face anymore the « pending uncommitted work » exception.
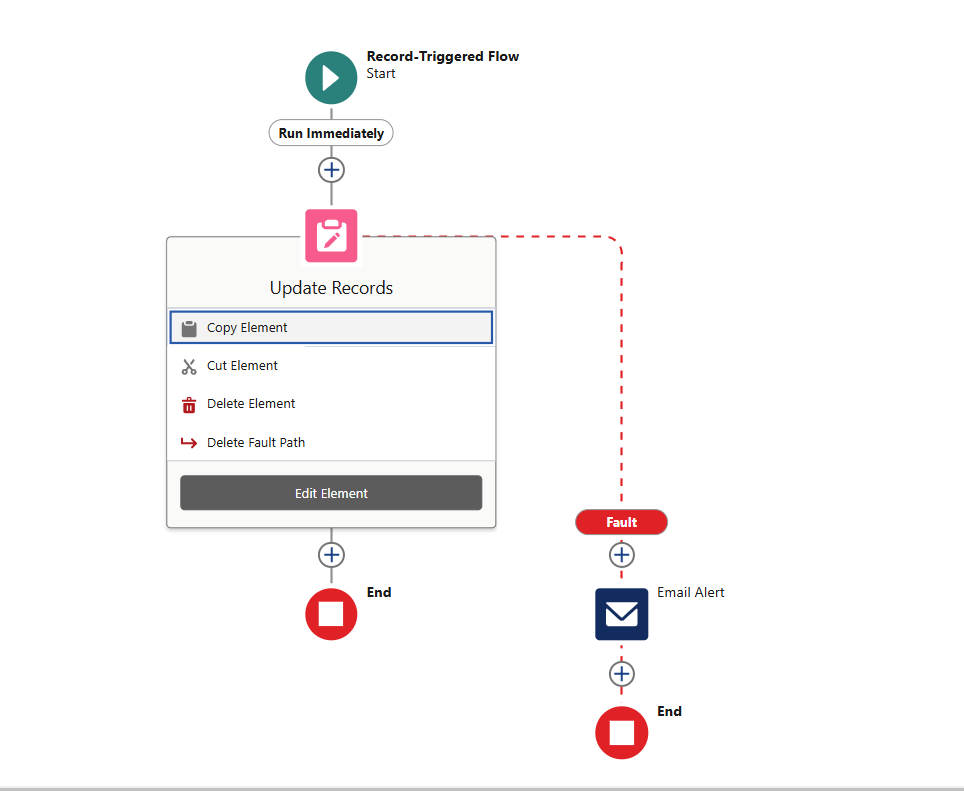
Eventually, since then, you also now have the possibility to catch errors in flows with error-sensitive Fault Paths. To do so, select the DML-related element, and create the Fault Path from it. You can delete the Fault Path from the same place.
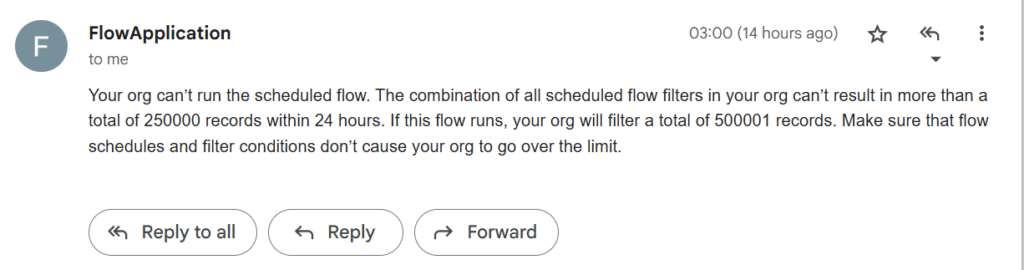
You have probably already faced a flow error message telling you that your scheduled flow was handling too many records. How can we avoid this error by limiting the number of retrieved records, as we would do in SOQL / Apex with a LIMIT ?
Flow error message when handling too many records
It now comes to an end with new Spring’25 Flow enhancement allowing you to define a limit number of records retrieved by a Get Records element.
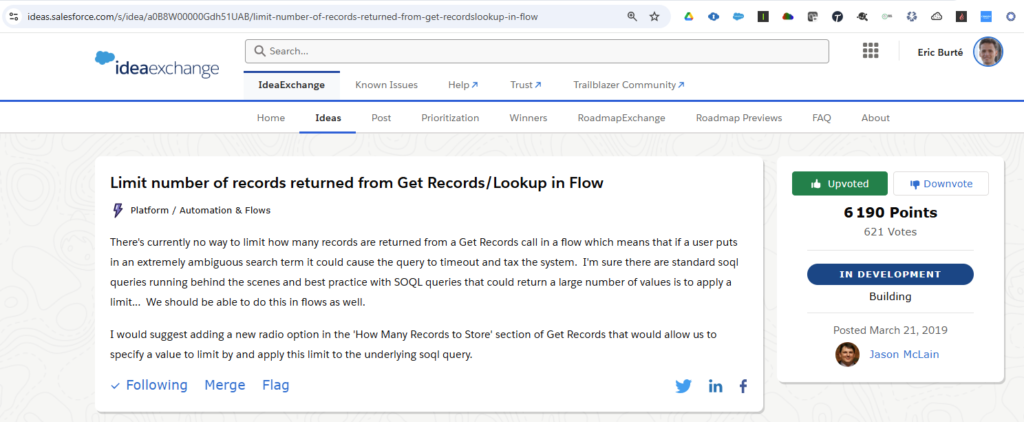
First, an idea was opened 5 years ago to ask for the possibility to add a limit on this Get Record, which is eventually a way to operate a DML operation, as you would have in SOQL with the LIMIT notion.
Here is a screenshot of this idea :
Idea on IdeaExchange at the origin of this feature
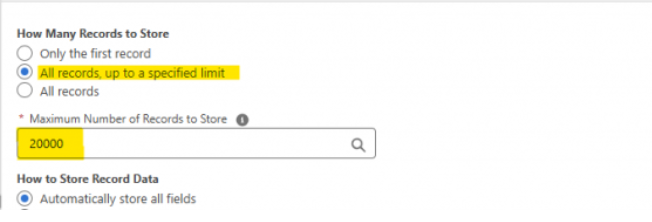
Since then, Salesforce’s Spring’25 release update brings now the possibility to specify the number of records to retrieve, in your Get Records elements (from 1 to 20 000 records).
Flow Builder – Get Records details pane – New choice to limit the number of retrieved records
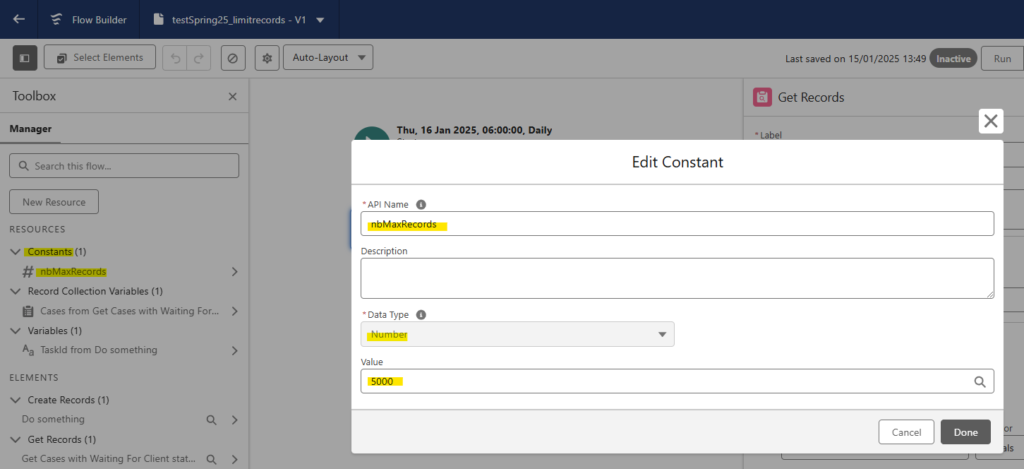
To do so, create a new constant number resources from the resources manager pane in Flow Builder (this way you will define this limit at a variable level) :
How to proceed to leverage this feature – Create a new variable to store the limit number
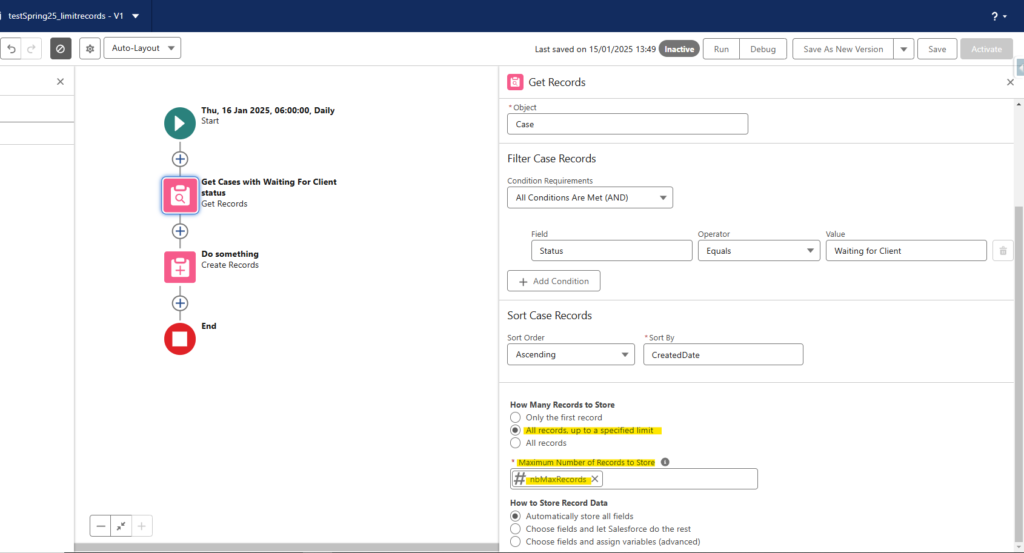
Thus, you would be able to use this resource in your Get Records element, as described here. You could naturally also define it directly here under, if that is something used only once in the Flow. But, as for now, I would suggest to keep and use the variable.
How to proceed to leverage this feature – Leverage this new variable in your Get Records element
Naturally, some complementary logic (some examples after) may need to be reviewed in your daily scheduled flows, to be sure you do not miss records (to be handled, but whose quantity would be greater than the limit value set) :
Create a scheduled job to launch the flow more frequently
If you have some date-related conditions in your flow, make sure that your flow is able to handle records from the day before (and not only today’s records as you may see in many scheduled flow samples)
In parallel, make sure to have the proper order set up in your Get Records, to handle older records that may have been forgotten from a previous daily execution, accordingly to your requirements. For example, use an ascending (ASC) order to be sure to start by the oldest records.
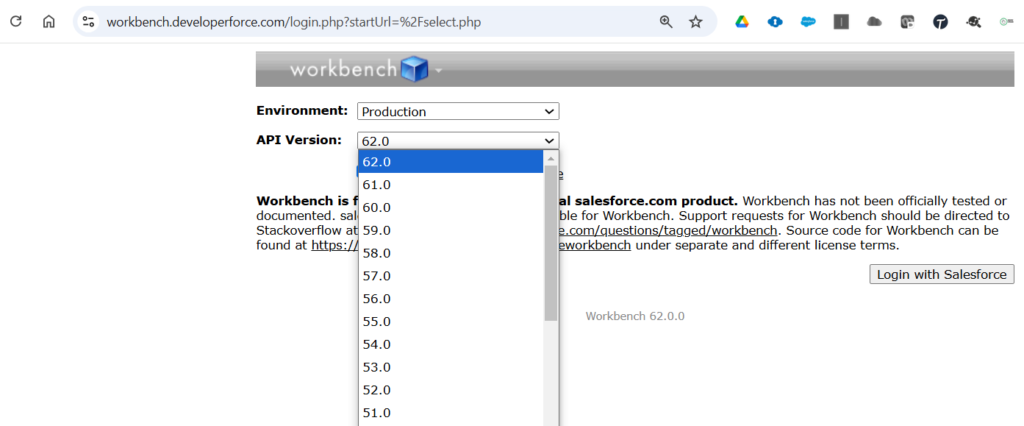
The API version selector in Workbench UI had been blocked on API v58.0 since end of 2023 (the API v59.0, matching the Winter’24 release update, and following, were not considered).
Workbench UI has been updated on mid December 2024, to fit the gap of the versions of all release updates that have occurred since then.
You can now choose up to v62.0 API version, when using this tool.
The Conditional Formatting feature has been progressively deployed in Salesforce instance, as a Christmas gift in advance, after Winter’25 upgrade. The time has now come to discover it, on your Salesforce instance.
To be able to use this feature, you should have migrated your concerned Lightning Page within Dynamic Forms.
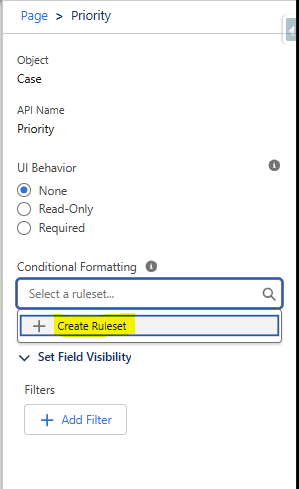
In your Lightning Page Builder, click on the field, on which you want to add this visual formatting configuration. In the detail right panel, you will find a new Conditional Formatting section.
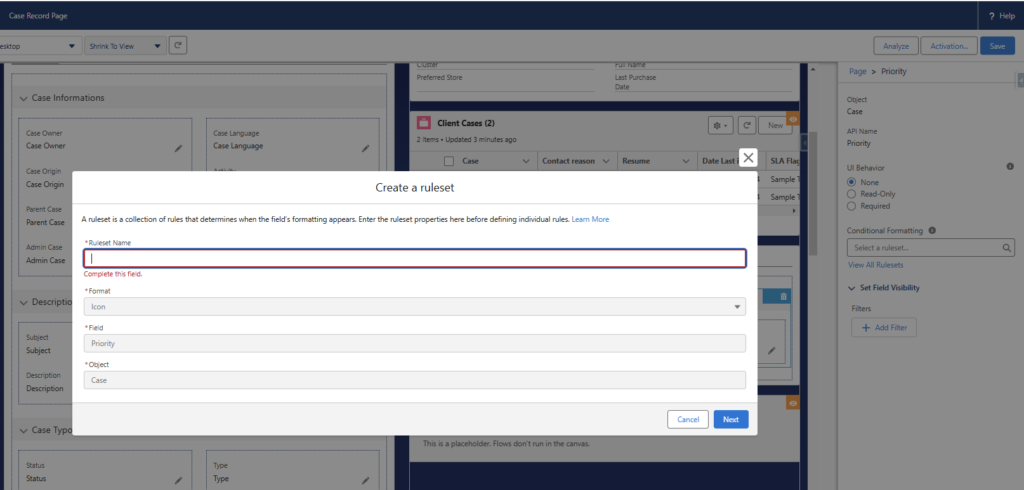
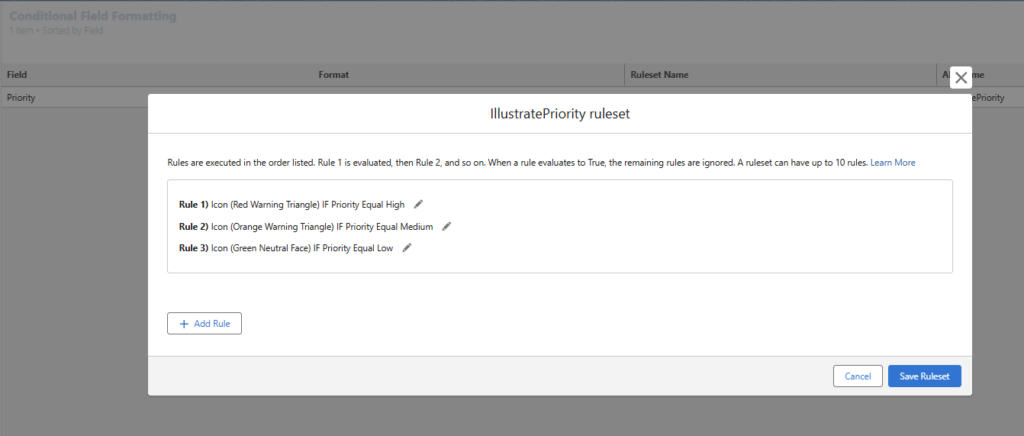
Click in the Component, and either edit the existing ruleset, or add a new ruleset by clicking on the « + Create Ruleset« . See below an example for the Priority field of the Case object.
As for now, you can only define the new ruleset name ; the other filled are grayed out and already filled in. It seems that we will soon be able to format fiels with other possibility than an icon (keep an eye to the roadmap)
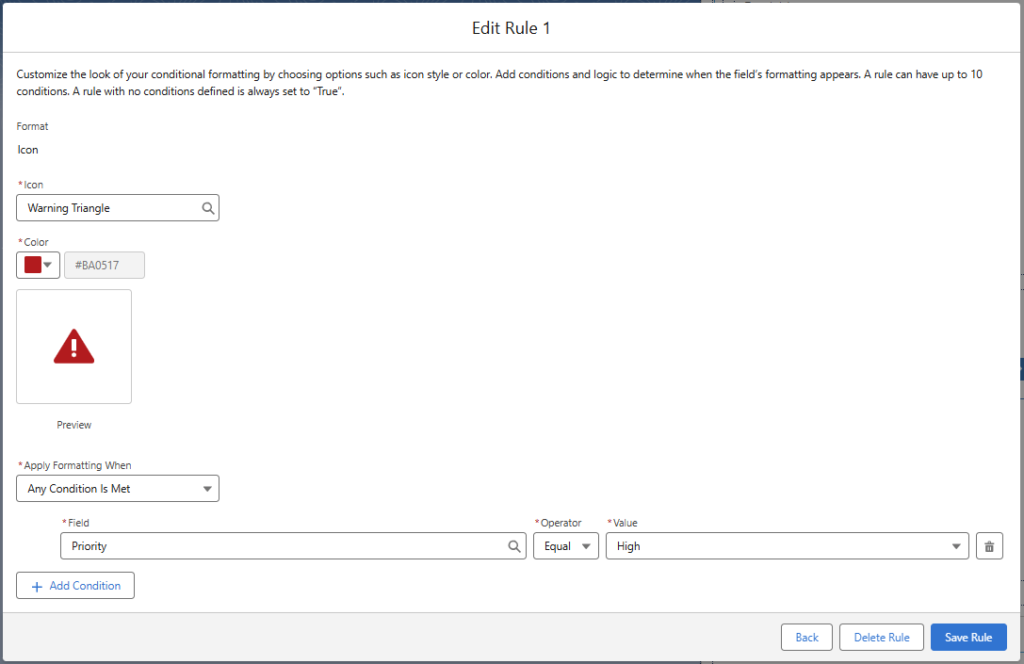
Once the ruleset is created, we are asked to add every possible rules concerning this field. The pieces of information to provide are both a condition, and an icon with a color to use when the field value matches the chosen condition.
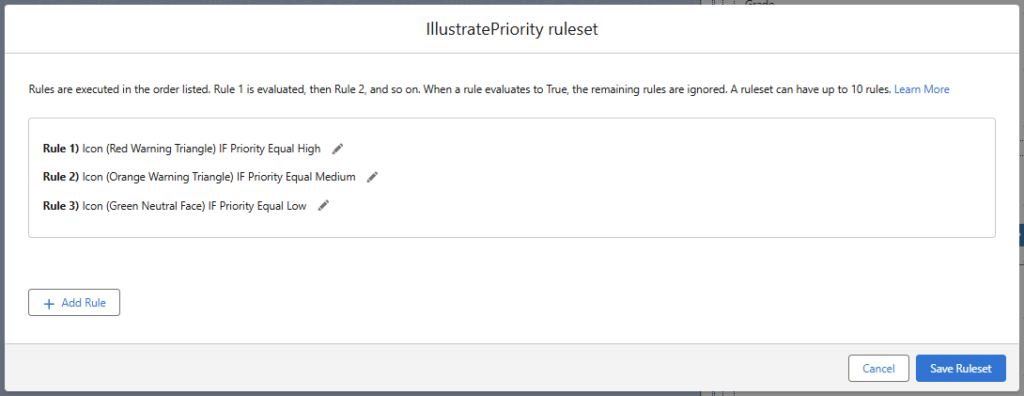
Eventually, the ruleset should include all rules set for this field. It will be displayed this way :
The ruleset configuration is now displayed both on the Lightning Page’s configuration page :
on the record field, with an Artist Palette icon next to the field component, indicating that there is a specific formatting applying :
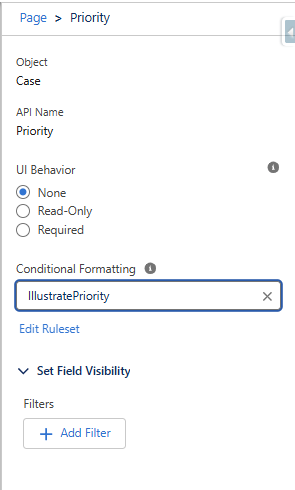
and in the detail panel, on the field configuration with the ruleset name mentionned
Testing the ruleset, you will see below how the chosen icons are displayed, accordingly to the picklist field values. Here are some examples for the Case’s Priority field :
It is important to mention that the icon only appears on the Lightning Page. The value of the field is not impacted. You will not get this information in a list view or a report for example !
Remark : You will probably begin to remove soon all formulas, which you have probably set up so far (with a concatenation of an emoji and a field value) to simulate such feature
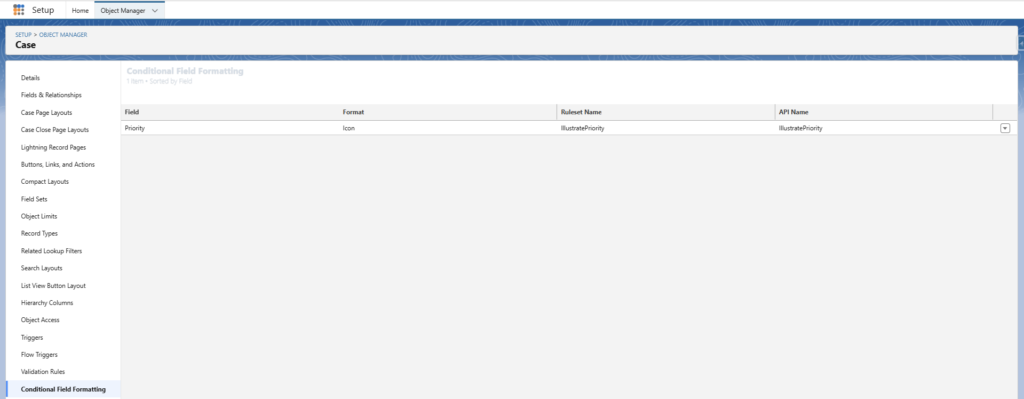
You can also access the Conditional Field formatting information, directly from the concerned object page, in Object Manager, instead of going through every pages.
In our case, when we click on the « Conditional Field Formatting » option in the Case object manager, we see the newly added configuration
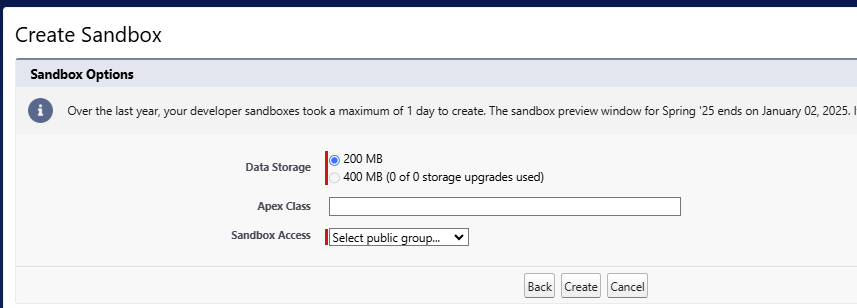
When you created a Salesforce Sandbox, the user creating the new sandbox was kept active to be able to login in this new sandbox, but all the other ones were created inactive.
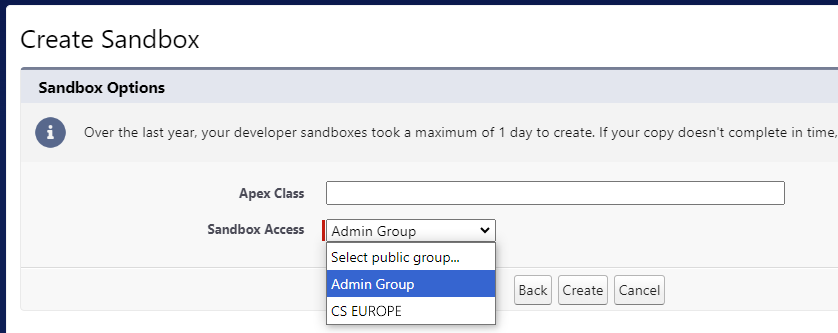
Now, since the last release, you can choose to keep active, all the users of a Public Group, by example an Admin / Tech Lead active group, or for release deployment user, that may be granted access on all sandboxes.
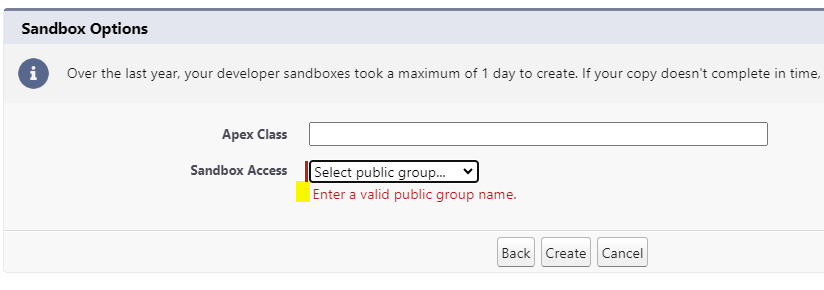
You are required to select a public group. That means you need to configure such Public Group to be able to go beyond this screen. As it is an one-off operation, that is something you can configure up front, and review when needed when resources leave or arrive.
As you can see on the screen, the group is mandatory. Otherwise, it will generate an error asking you to enter a valid group name
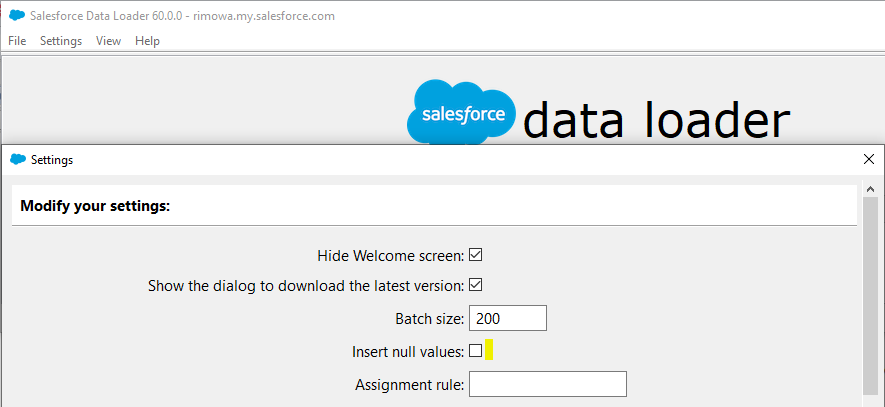
When you import data in Salesforce, you can naturally force the insertion of null values in Data Loader, when your data require it (fields filled in on certain records, but left empty for others).
In this case, when you leverage the REST API, in Data Loader, you can check the option to be able to insert null values :
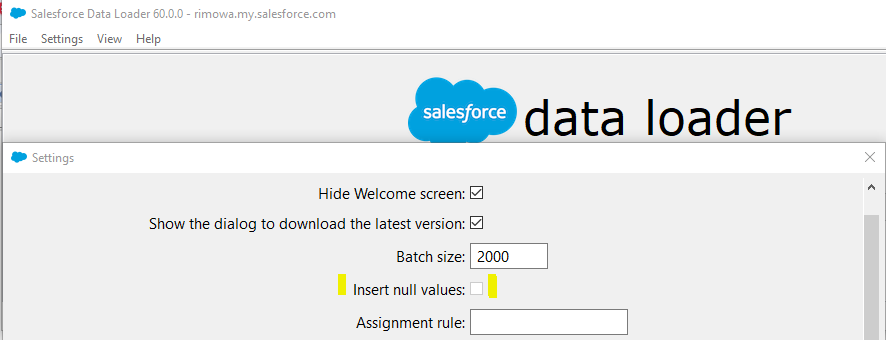
But, when inserting data with BULK API, you do not have the possibility to force the null values, as you can see in the screenshots below :
when clicking the Bulk API option…
DataLoader settings – « Use Bulk API » option enabled
…then immediately the « Insert null values » option is grayed out, and you cannot check it anymore
DataLoader settings – the « insert null values » is grayed out, when « Use Bulk API » is checked
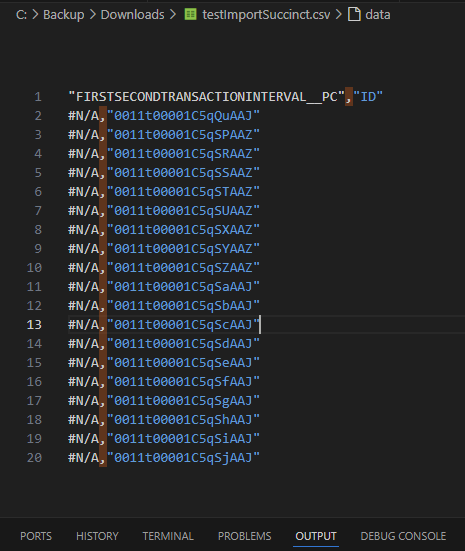
To be able to insert data, in Bulk mode, with fields filled in with null values, you have to edit your CSV file, and replace the null values or empty values by the #N/A text, as you can see in the example below :
DataLoader settings – CSV file with #N/A value to insert null values in BUL.K API mode