SUMMER’25 – New login experience in Salesforce with email address

If you have too many Salesforce usernames to remember, this new login experience will allow you to log in to your Salesforce instances by simply using your email address.

When using a domain (domainname.lightning.force.com), the email option is not proposed. You will see this option only when logging with generic login.salesforce.com.

Login experience with Email – Login page with new button to access this new login experience

The following article explains how you log in to Salesforce with your email address.

FIRST LOGIN WITH AN EMAIL ADDRESS

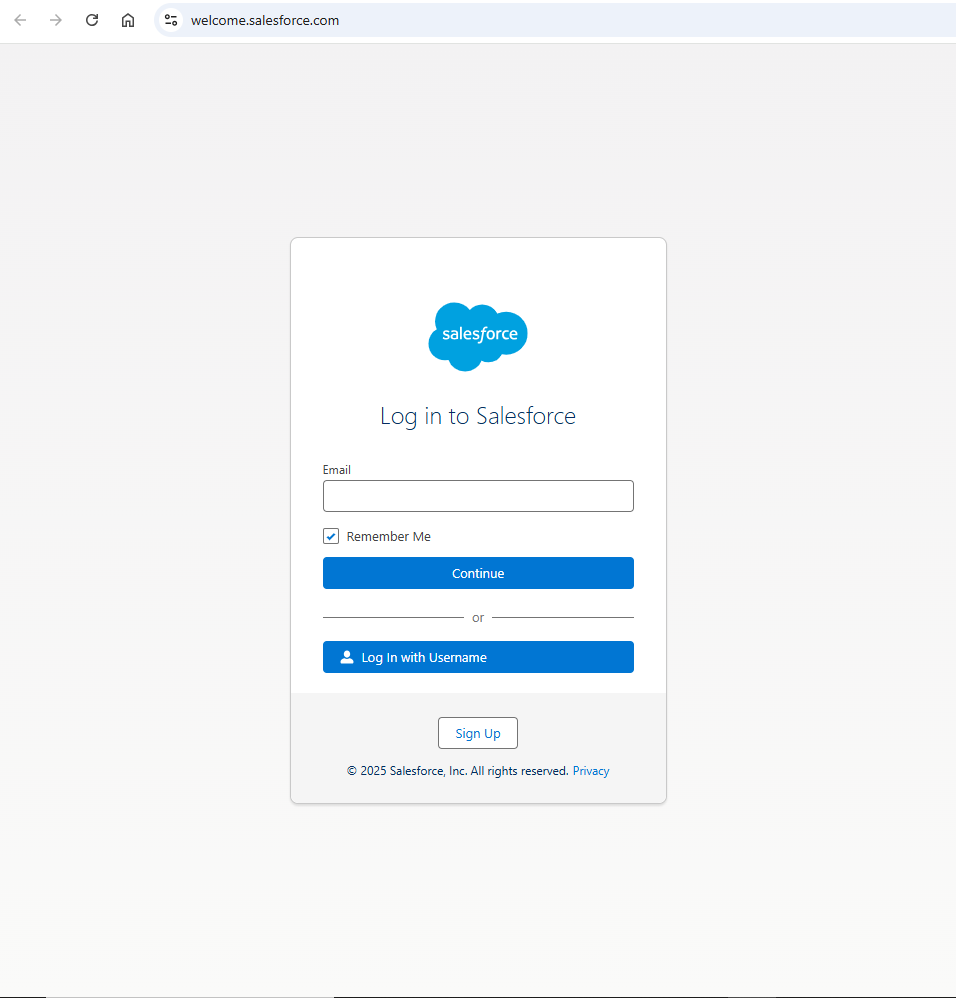
When it is the first time you try to log in with an email, the login page will ask you to enter an email address. Please fill in the Email address input field, with the email address mentioned on your Salesforce users.

Login experience with Email – First step is to select the email OR fill in the email to use (the first time)

Accordingly, on your first login with this email, you will be asked to verify it with a 6-digit code, which will naturally be sent to your email address, you are logging with !

Email with verification code
Page to enter 6-digit verification code

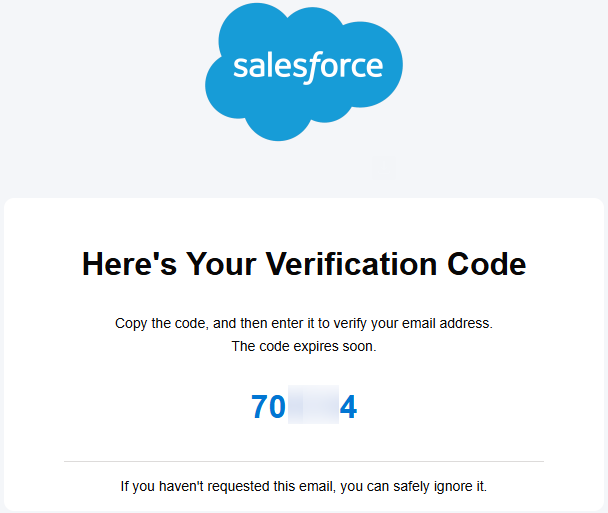
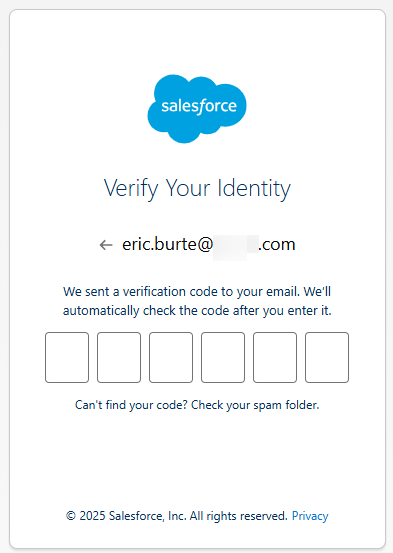
Please check your email spam folder if you do not receive this email.

LOGIN WITH AN EMAIL ADDRESS ALREADY USED ON THE LOGIN PAGE

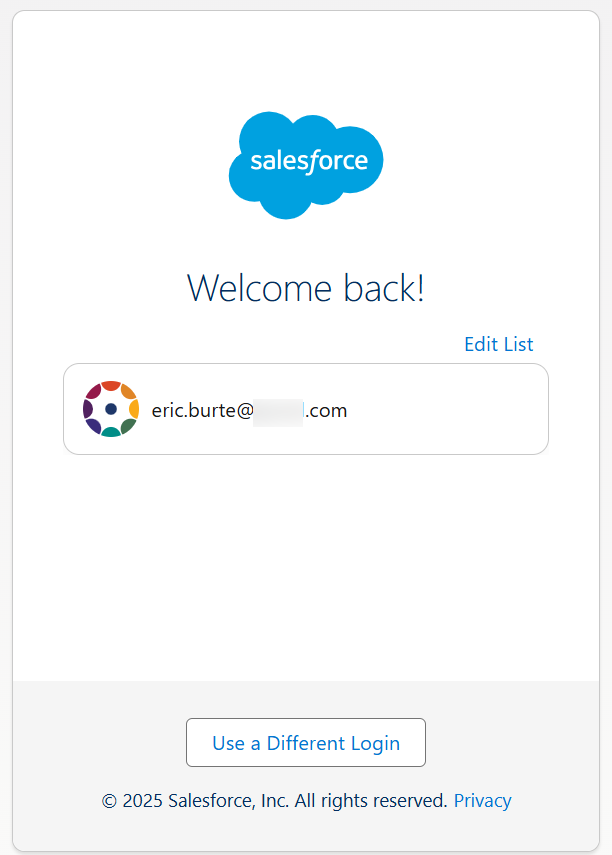
If you have already used your email addresses to log in, this new Salesforce welcome login page will then propose you all the email addresses used so far.

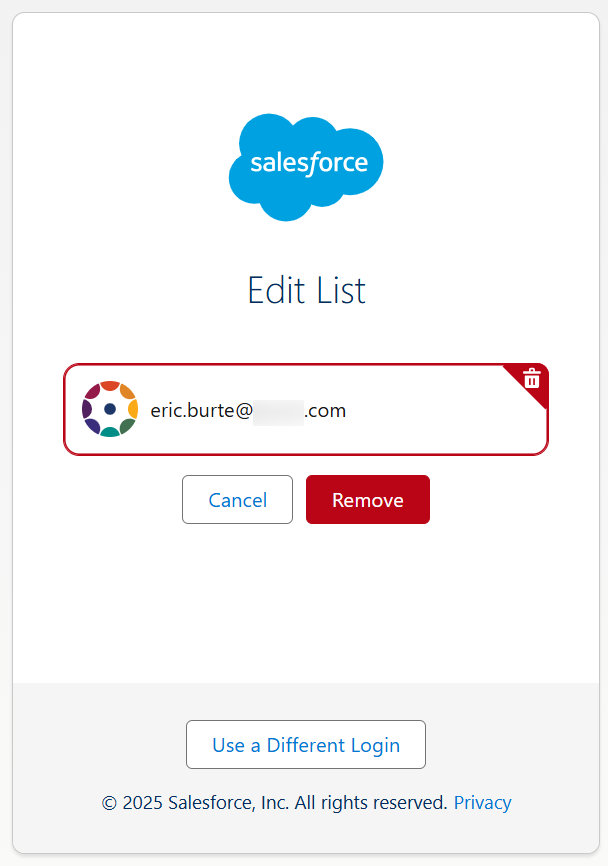
You will be able to use other email addresses, and edit this list for better login management. In this case, note that you will be able to organize or remove recently used email addresses.

Login page with email address
Email addresses management in Salesforce Welcome login page

MANAGE YOUR ENVIRONMENT SWITCHER PAGE

If your email address is linked to multiple Salesforce accounts, you can see them all in the Environment Switcher. You will find there your Production usernames, and your Developer Editions usernames, which are linked to the specified email address.

Salesforce Environment Switcher – the list of production / dev edition linked to your email address

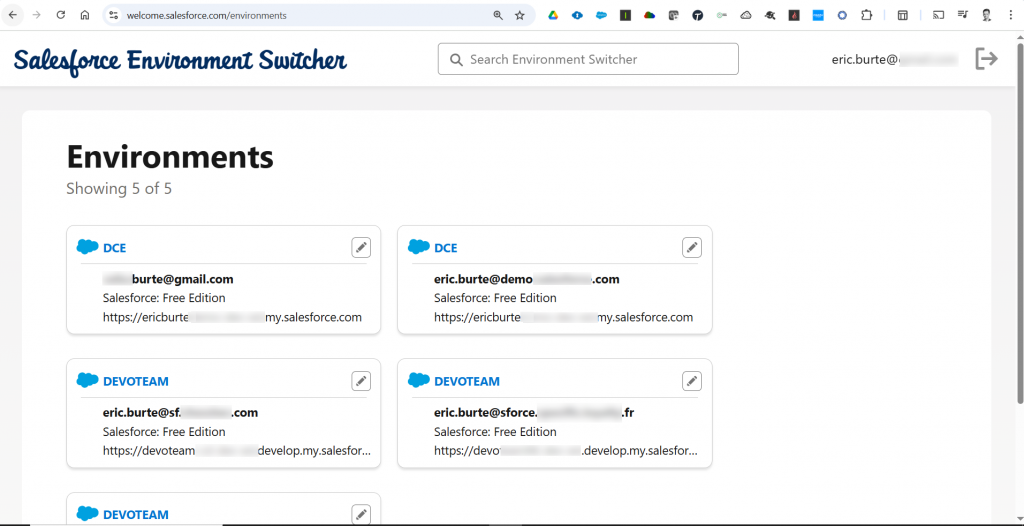
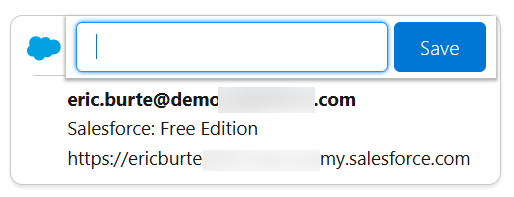
Now, from this page, you can change the name of your instance names, displayed in the instance tiles of your Environment Switcher, so that it will be more meaningful for you, and easier to keep your cool in this list.

To do so, click on the pencil icon of your instance tile, change its name and save.

Environment Switcher – click the pencil to rename the instance tile
Environment Switcher – rename and save the instance tile name

To log into your Salesforce instance, just click on the link in the header of the instance tile. The link is built this way : https://welcome.salesforce.com/environments#-51

Environment Switcher – click the tile name to log in to it

FINALIZE YOUR LOGIN

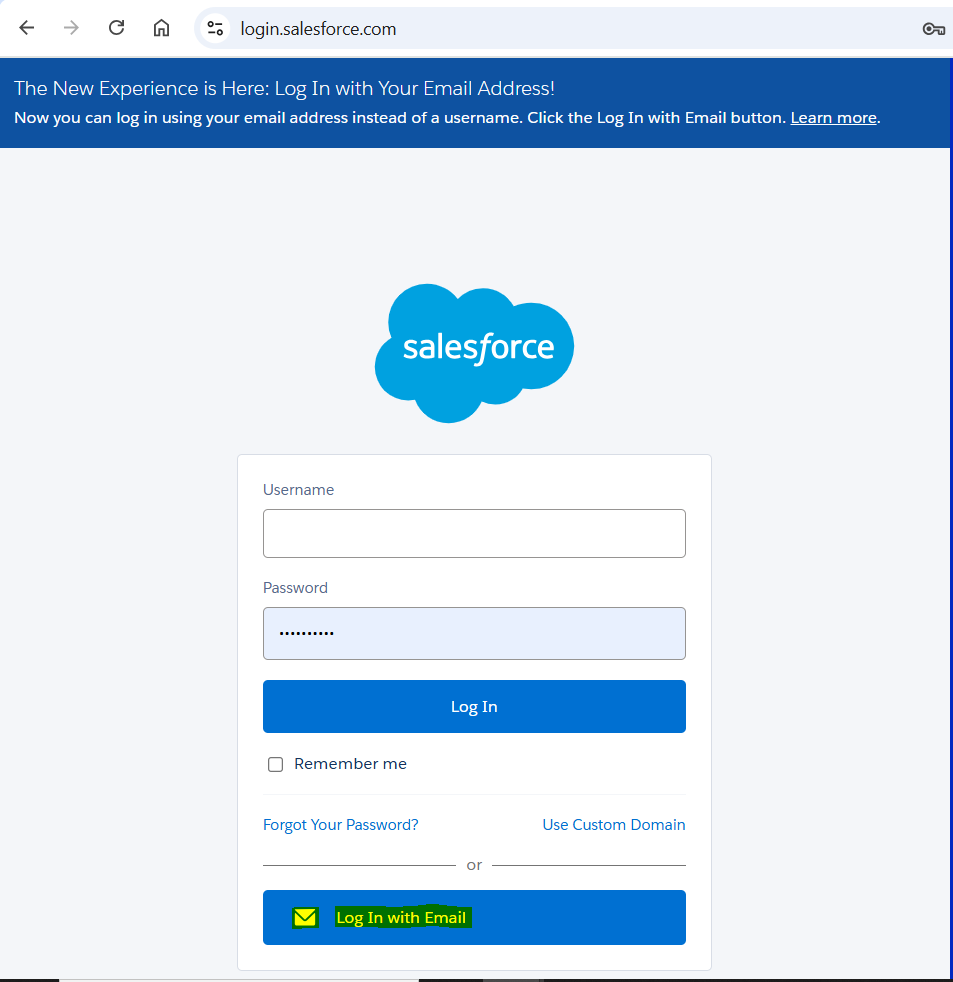
Then, once you have clicked on the link of the instance / username to log in with, Salesforce brings you on a welcome login page on which you would have to finalize your login process.

Login page – Once the instance has been chosen, you just need to type in your username password

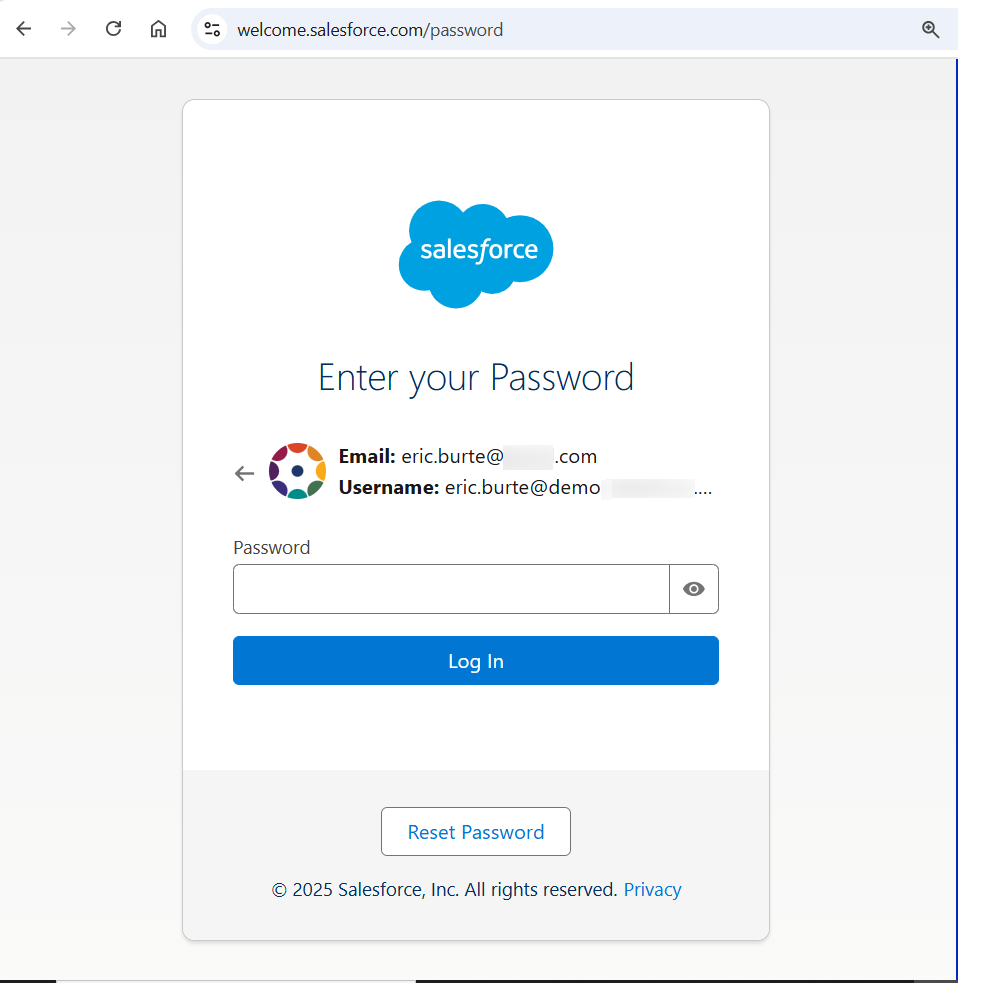
Finally, you just have to fill in your password and click the Log In button, to access your selected instance. That is how you leverage new login experience with your email address !


To read more on the subject

Log In with Your Email Address : https://salesforce.vidyard.com/watch/nVj5vidvHYbwHHfMWPrEcU

Log In with Your Email Address Help Topic: https://help.salesforce.com/s/articleView?id=xcloud.log_in_with_email.htm&type=5


SALESFORCE #TIPS – Activate new SLDS 2 theme (Cosmos)

You have probably seen that a new SLDS 2 theme was released a few months ago. Read the following article to know how to preview new SLDS 2 theme, and enable it, in your Salesforce instances !

BEFORE MIGRATING TO A NEW THEME

As you already know, this is the way a Salesforce record (a well-known account in this example) is displayed in Salesforce, with the current theme :

  • a Record detail page, with current theme
Current theme – Record detail page view
  • a Related lists page, with the same current theme
Current theme – Related list page view

PREVIEW THE NEW THEME FIRST

To preview or/and enable the new SLDS 2 theme, go to Setup > Themes and Branding. You will then ve able to see both :

  • The active theme in this instance is the classic (and efficient) Lightning Blue
  • The recent Salesforce Cosmos SLDS 2 theme, on the last line of the tab
Setup – Themes and Branding – Current configuration

It is always a best practice to preview a theme before activating it (as it is for all release update / new feature). It avoids bad surprises. To preview SLDS 2 new theme, select the Cosmos SLDS2 line, click on the down arrow button, at the end of the line, and click on Preview.

Setup – Themes and Branding – Preview new theme first, before activating it

You can now navigate throughout your Salesforce applications, to see how the components and pages render with the new theme. For information, you will get a banner, on the top of your page, to easily quit the theme preview mode (« End preview » link):

Top banner reminder, allowing you to quit the preview mode
New SLDS2 theme – Record detail page view with the new theme
New SLDS 2 theme – Related list page view with the new theme
New SLDS 2 theme – An example of a new record page layout, with the new theme

As always, the View option (from within the down arrow button, on the theme line) allows you to see the branding details / color palette of the theme

View Theme – Just for visualization (or modification for custom ones)

ENABLE A NEW THEME (SLDS 2 still in Beta, though)

If you want to customize a theme for your instance, please create a new one (« New Theme » for SLDS2 theme, « New SLDS 1 Theme » for a standard SLDS1 theme), and customize it. This way it will be easier to come back to the standard theme.

Setup – if you want to customize a theme, please create it first (SLDS 1 or SLDS 2)

A new theme will then be available in the Themes and Branding tab !

Then, once you have made up your mind about the theme to leverage (standard OOTB SLDS 2 Cosmos theme, or new customized one created as presented before), go back to previous screen, select the theme that you want to activate in the Themes and Branding tab, click on the down arrow button, and choose « Activate » to activate the chosen theme.

Setup – Themes and Branding – Activate a theme

Be aware that this theme feature is still in beta, and thus there coud be some side-effects, as reminded by Salesforce.

Information banner explaining the SLDS 2 is still in beta

If you activated the SLDS 2 theme and – due to some issues – you want to go back to former theme, go back to setting, select a standard SLDS 1 theme (like the famous « Lightning Blue » we have already mentioned) and activate this one. The theme will then get back to normal.

Have fun with this new theme !


To read more on the subject


TDX’25 – Free Salesforce Developer Edition with Agentforce

One of big announcement of Salesforce TDX 2025 is the possibility to provision a developer edition with all Agentforce related features available in it. We will show how to provision it.

And great precision – compared to former Agentforce / Data Cloud playgrounds with which you may have played for your Trailhead modules so far – this Agentforce-fueled Dev Edition is available as long as your regularly use it (one login every 45 days !).

The QR Code to flash to get your own AI-fueled personal Dev Edition

Agentforce Dev Edition home page

For information, other news about Headless / Agentforce API have been shared during this session ; Agentforce is not only used by an human

New features related to Agentforce, centered on enhancing the interaction with the platform

This communication echoes some previous materials shared by Salesforce teams, like the two following ones, available in Youtube, on Salesforce Developers‘ account, published a couple of weeks, before TDX’25 event :

More to read in the coming weeks, for sure, to see all new use cases possibilities !


To read more on the subject


SPRING’25 – Add a limit on Salesforce Flow’s GetRecord elements

You have probably already faced a flow error message telling you that your scheduled flow was handling too many records. How can we avoid this error by limiting the number of retrieved records, as we would do in SOQL / Apex with a LIMIT ?

Flow error message when handling too many records

It now comes to an end with new Spring’25 Flow enhancement allowing you to define a limit number of records retrieved by a Get Records element.

First, an idea was opened 5 years ago to ask for the possibility to add a limit on this Get Record, which is eventually a way to operate a DML operation, as you would have in SOQL with the LIMIT notion.

Here is a screenshot of this idea :

Idea on IdeaExchange at the origin of this feature

Since then, Salesforce’s Spring’25 release update brings now the possibility to specify the number of records to retrieve, in your Get Records elements (from 1 to 20 000 records).

Flow Builder – Get Records details pane – New choice to limit the number of retrieved records

To do so, create a new constant number resources from the resources manager pane in Flow Builder (this way you will define this limit at a variable level) :

How to proceed to leverage this feature – Create a new variable to store the limit number

Thus, you would be able to use this resource in your Get Records element, as described here. You could naturally also define it directly here under, if that is something used only once in the Flow. But, as for now, I would suggest to keep and use the variable.

How to proceed to leverage this feature – Leverage this new variable in your Get Records element

Naturally, some complementary logic (some examples after) may need to be reviewed in your daily scheduled flows, to be sure you do not miss records (to be handled, but whose quantity would be greater than the limit value set) :

  • Create a scheduled job to launch the flow more frequently
  • If you have some date-related conditions in your flow, make sure that your flow is able to handle records from the day before (and not only today’s records as you may see in many scheduled flow samples)
  • In parallel, make sure to have the proper order set up in your Get Records, to handle older records that may have been forgotten from a previous daily execution, accordingly to your requirements. For example, use an ascending (ASC) order to be sure to start by the oldest records.


To read more on the subject :


WINTER’25 – Salesforce API version selector in Workbench – Update of the API version selector

The API version selector in Workbench UI had been blocked on API v58.0 since end of 2023 (the API v59.0, matching the Winter’24 release update, and following, were not considered).

Workbench UI has been updated on mid December 2024, to fit the gap of the versions of all release updates that have occurred since then.

You can now choose up to v62.0 API version, when using this tool.

Thanks to the Workbench team for the update !


WINTER’25 – Post Upgrade – Add Conditional Formatting to fields on Dynamic Forms

The Conditional Formatting feature has been progressively deployed in Salesforce instance, as a Christmas gift in advance, after Winter’25 upgrade. The time has now come to discover it, on your Salesforce instance.

To be able to use this feature, you should have migrated your concerned Lightning Page within Dynamic Forms.

In your Lightning Page Builder, click on the field, on which you want to add this visual formatting configuration. In the detail right panel, you will find a new Conditional Formatting section.

Click in the Component, and either edit the existing ruleset, or add a new ruleset by clicking on the « + Create Ruleset« . See below an example for the Priority field of the Case object.

As for now, you can only define the new ruleset name ; the other filled are grayed out and already filled in. It seems that we will soon be able to format fiels with other possibility than an icon (keep an eye to the roadmap)

Once the ruleset is created, we are asked to add every possible rules concerning this field. The pieces of information to provide are both a condition, and an icon with a color to use when the field value matches the chosen condition.

Eventually, the ruleset should include all rules set for this field. It will be displayed this way :

The ruleset configuration is now displayed both on the Lightning Page’s configuration page :

  • on the record field, with an Artist Palette icon next to the field component, indicating that there is a specific formatting applying :
  • and in the detail panel, on the field configuration with the ruleset name mentionned

Testing the ruleset, you will see below how the chosen icons are displayed, accordingly to the picklist field values. Here are some examples for the Case’s Priority field :

It is important to mention that the icon only appears on the Lightning Page. The value of the field is not impacted. You will not get this information in a list view or a report for example !

Remark : You will probably begin to remove soon all formulas, which you have probably set up so far (with a concatenation of an emoji and a field value) to simulate such feature


You can also access the Conditional Field formatting information, directly from the concerned object page, in Object Manager, instead of going through every pages.

In our case, when we click on the « Conditional Field Formatting » option in the Case object manager, we see the newly added configuration

We can even edit or delete the ruleset from here.


To read more on the subject :

WINTER’25 – Create a sandbox with already active Key Users

When you created a Salesforce Sandbox, the user creating the new sandbox was kept active to be able to login in this new sandbox, but all the other ones were created inactive.

Now, since the last release, you can choose to keep active, all the users of a Public Group, by example an Admin / Tech Lead active group, or for release deployment user, that may be granted access on all sandboxes.

You are required to select a public group. That means you need to configure such Public Group to be able to go beyond this screen. As it is an one-off operation, that is something you can configure up front, and review when needed when resources leave or arrive.

As you can see on the screen, the group is mandatory. Otherwise, it will generate an error asking you to enter a valid group name


To read more on the subject :

SALESFORCE #TIPS – Insert null in a number field with Data Loader (especially in BULK API mode)

When you import data in Salesforce, you can naturally force the insertion of null values in Data Loader, when your data require it (fields filled in on certain records, but left empty for others).

In this case, when you leverage the REST API, in Data Loader, you can check the option to be able to insert null values :

But, when inserting data with BULK API, you do not have the possibility to force the null values, as you can see in the screenshots below :

  • when clicking the Bulk API option…
DataLoader settings – « Use Bulk API » option enabled
  • …then immediately the « Insert null values » option is grayed out, and you cannot check it anymore
DataLoader settings – the « insert null values » is grayed out, when « Use Bulk API » is checked

To be able to insert data, in Bulk mode, with fields filled in with null values, you have to edit your CSV file, and replace the null values or empty values by the #N/A text, as you can see in the example below :

DataLoader settings – CSV file with #N/A value to insert null values in BUL.K API mode

Enjoy you fast data imports with BULK API


To read more on the subject :

SALESFORCE #TIPS – Check where a Salesforce self-signed certificate is used

When you receive an email form Salesforce telling you a certificate is about to expire, you can see that the communication mentions the concerned instance either in the email subject (Sandbox is mentioned) and in the email body.

Here are the actions asked by Salesforce to take care of it (copied from Salesforce kind reminder) :

1. In Setup, on the Certificate and Key Management page, download the expiring certificate. Save it in case you require access to its key in the future.
2. Generate a new self-signed or CA-signed certificate.
3. Update connections to external sites or other services with your new certificate.
4. When your new certificate is tested and in use, delete the old certificate.

About the certification backup, do not hesitate to create a directory in your company’s SharePoint, just to avoid to lose track of them. You should normally never use these backups, but you never know 🙂

First, you have to create a brand new self-signed certificate. To do so, please go to go to Setup > Certificate and Key Management > Create Self-Signed Certificate

You need then to update all connected apps or SSO settings, that were using the ‘soon to be expired’ self-signed certificate, to make them use the newly created one.

Once done, go to Setup > Certificate and Key Management to navigate towards the ‘soon to be expired’ self-signed certificate, to delete it… or at least try to do so 😉

Just get your cursor above the Delete button, which is grayed out, and you will know where your certificate is still used. As you can see in the screenshot below, the system mentions in the contextual information, the place where the certificate is still used.

Here, we may see that we forgot to reconfigure a SSO Setting using this « soon to be expired » certificate.

In this case navigate to your Single Sign-On settings, in your instance setup, edit your SSO configuration, check the Request Signing Certificate, and update it to the most recent certificate.

The certificate can now be deleted (the button is not grayed anymore) :

I would suggest not to delete your certificate right after this operation, but to wait for a week, or at least a couple of business days, to be sure there has been no impact, before deleting it eventually.

Do not forget to

  • test your SSO login before ending your task !
  • monitor the Identity Provider Event Log (in the setup) to validate that the certificate update has not generated any issue.


To read more on the subject :

Winter’24 – Permission Set Summary (Beta)

In Winter’24 preview, there is a new feature that is in beta testing, that allows to consolidate and present an overall vision of all permissions present within a given Permission Set.

To access this summary, you should navigate in Setup, to the given permission set, and click on « View Summary (beta)« 

A complete summary of all included permissions, of this Permission Set, is then displayed, without needing to deep dive in the usual permission menu (that you could see in the grey section of the bottom of the previous screenshot).


The top section of the page displays :

  • A first block with the Permission Set summary information,
  • Information about all permission set groups, which include the Permission Set

The section below presents :

  • The System Permissions present within the enabled Permission Set (before you had to go to the System Permission sub menu, and scroll through the whole page with all System Permissions, to see which ones have been enabled),
  • The Object permissions
  • The Field permissions